1 week ago
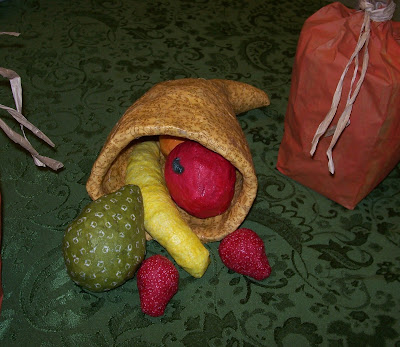
Thanksgiving Cornucopia #3
Finally all mod-podged! I love the way it turned out! I could call it finished now but i do agree with Hubs that the strawberries would look way better with some green leaves on top. If i figure out how to do it (and if i have the right material) then i will attempt it. If now... well i think it's good enough how it is!
Read more...
Playroom/Girls Room In The Works Part #2
>> Monday, November 19, 2012
Now that football season is over Hubby is able to get back working in the girls room. He finished the the hills and added clouds. Next will be going over it again and adding details like flowers and toadstools and the big tree :)
Read more...
Thanksgiving Cornucopia #2
So once i took the aluminum foil and plastic out of the middle the edge of the cornucopia was very thin. I did want to put on layer after layer to make it thicker but i wanted it to look more basket or bread looking. I took more newspaper and rolled it into a thin roll, wet it and morphed it to the shape of the edge of the cornucopia. I then took strips of newspaper and used my flour paste and basically taped the rolled newspaper to the edge of the cornucopia. This is what it looked like when i was done. See that the edge look thicker now? The illusion that the whole thing is thicker. Just what i wanted!
Here is a picture of where i stopped at right now. The inside is covered but the edges and the outside is 1/2 finished. I'm letting it dry and giving myself a rest before i finish it.
There are the finished fruit. Although my artsy Hubby said i should somehow with fabric add tops to the strawberries. (we will see if i get to that!) The Orange and banana had to be covered twice because the material was thin and you still could see some of the newspaper color coming through. I'm glad i got them all done!
I'm cutting it close to Thanksgiving! I hope to have it all done tonight (crossing my fingers). Tomorrow starts the cooking :)
Read more...
Labels:
Crafts,
Holidays,
Personals,
Thanksgiving,
Tutorials
Thanksgiving Cornucopia #1
>> Monday, November 12, 2012
This is a very cheap craft project for Thanksgiving. I had everything i needed.
So far i have used:
- Newspaper
- Yarn
- Scissors
- Water
- Aluminium Foil
- A Store Plastic Bag
- Tape
- Flour
Wet newspaper and shape into desired shape. Tie on a piece of yarn.
Wrap yarn around and mold into desired shape. Leave to dry completely
These were my little helpers, with their goofy smiles :)
My helpers told me what shapes to make.
So far here we have an apple, orange, two strawberries, pear and banana.
These we will layer with mod podge and fabric to give it that rustic look.
Next we make the cornucopia. Mix flour and water together till your get a soupy texture. This is our homemade glue. Take aluminium foil and form into desired cornucopia shape. Then wrap the cornucopia shape with grocery store plastic bag. Tape bag snugly to shape. This will hopefully allow the newspaper not to stick and where you can pull out the aluminium foil once dry.
Cut newspaper into strips. Paint flour paste on one side of the strip of paper and wrap onto cornucopia shape. I used a basting brush.
Keep layering newspaper strips on, the more layers the stronger the cornucopia will be.
Once enough layers are applied you could either mod podge with fabric like the fruit/vegetables or you could paint.
Next steps soon to follow!
Read more...
Labels:
Crafts,
Holidays,
Personals,
Thanksgiving,
Tutorials
Subscribe to:
Comments (Atom)


