Showing posts with label Crafts. Show all posts

Chore Chart (4)

>> Saturday, July 06, 2013

Making progress!!!!

Since i last posted about the charts we have done quite a bit. With a young baby and a total of three kids now, i’m finding it harder to find the time to sit down and post about things. My coupon blog especially is suffering from neglect.

Anyways Hubby built the frames for the charts and cut the metal to size. Then we had the girls mix their own colors (with my help of course) and we painted the frames.

20130627_120426 20130627_121336 20130627_122723 20130627_123638 20130627_150857

All the frames in the house are black and we wanted them to match but also be unique, so we spray painted them black and then are using sand paper to age the frames and sand the black off till the color pops through.

Then Bob used a paint pen and drew the rid onto the metal.

20130628_152406-1 

today i worked on getting the magnet stripes onto the backs of the magnets we made. I started out using gorilla glue but the one we bought said it needed to sit for 24 hours for it to be done, so instead i switched to super glue and it made the job MUCH faster. I used up all the magnet stripes this afternoon and almost got magnet onto all the backs. Good thing i have already ordered more magnet strips and they will be here by Tuesday. Woot!

20130706_152825

The very last row on the right still does not have magnets on them but everything to the left of it does. I’m so excited!

Here is a glimpse of Matthew’s finished board after being sanded and a few of the magnets on there. I wanted more of a pop of color and i might have been able to achieve that if we would have bought spray paint colors but we were trying to save money and use the stuff we had.

20130706_152914

Also along with the magnet stripes i ordered i ordered the reward tickets the girls will earn.

31D-Kz2bD4L 41XAGq0ixLL

The yellow (neutral) tickets will be worth the lowest and the pink will be worth more. I have blue tickets saved on amazon for when Matthew gets old enough to do it i will order the blue ones and they will be the worth more for him. I knew the girls would love the pink so i needed to have a boy color too.

I have saved some small espresso cans and i plan on taking them and helping the girls custom design the out side of them and those will be their personal ticket jars to keep their earned tickets in.

And just today the girls earned their first reward tickets. Me and Bob spent time trimming the vines on our back fence and it left a big mess of limbs on the ground. So we asked the girls if they wanted to earn some tickets by picking up the limbs for us and putting it in the big trash can. They both were uber excited to earn tickets and said yes. They picked up all the limbs with out much coxing to finish. It was a big job so i think they will get at least 2 tickets which normal chores will only earn 1.

We still have to sit down and figure out how many tickets for which prizes and figure out a points system.


Then along with that order i got these:

51D6pjgzhzL._SL1250_

51zG4Or5IAL._SL1250_

I was reading a site about chores and this lady made up cleaning totes for each of her kids. So i looked on amazon and found this small cleaning totes in bright colors. I got Anabel pink to match her chore chart and Abby purple to match hers.

I’ve already bought small hand brooms and dust pans for them, dusters and small spray bottles which i will make up a mild homemade cleaning solution up for them. Some other things i’m thinking about getting for their cleaning kits are some disinfecting wipes, lint roller and a rag. The rag i’m hoping to get a pink and purple one… then i think i am going to fold it over and sew the edge so it becomes almost a glove to it’s easier to wipe things.

I’m hoping this will make cleaning chores more fun for them.


On a side note i posted about making year memory books for the girls.

PhotoGrid_1372082239021-1

They are binders that you keep their art and such in them. Well i also bought some 4x6 picture protectors that go in a binder and i got super excited. Now i’m able to slide pictures from the year in there as well. With this same amazon order i was able to get 200 more page protectors (since i’ve already ran out of the ones i had because Anabel colors so much). Page protectors are not cheap but i was able to get the 200 for the same price as about 100 of them at wal-mart so i was super happy!

Read more...

Thanksgiving Cornucopia #3

>> Tuesday, November 20, 2012

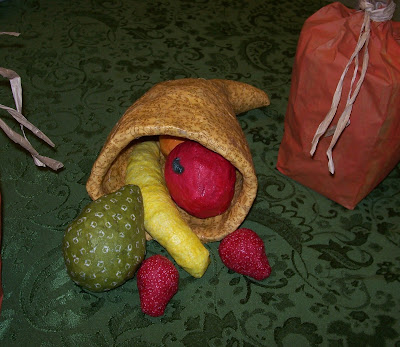
Finally all mod-podged! I love the way it turned out! I could call it finished now but i do agree with Hubs that the strawberries would look way better with some green leaves on top. If i figure out how to do it (and if i have the right material) then i will attempt it. If now... well i think it's good enough how it is!


Read more...

Thanksgiving Cornucopia #2

>> Monday, November 19, 2012

So once i took the aluminum foil and plastic out of the middle the edge of the cornucopia was very thin. I did want to put on layer after layer to make it thicker but i wanted it to look more basket or bread looking. I took more newspaper and rolled it into a thin roll, wet it and morphed it to the shape of the edge of the cornucopia. I then took strips of newspaper and used my flour paste and basically taped the rolled newspaper to the edge of the cornucopia. This is what it looked like when i was done. See that the edge look thicker now? The illusion that the whole thing is thicker. Just what i wanted!

Here is a picture of where i stopped at right now. The inside is covered but the edges and the outside is 1/2 finished. I'm letting it dry and giving myself a rest before i finish it.

There are the finished fruit. Although my artsy Hubby said i should somehow with fabric add tops to the strawberries. (we will see if i get to that!) The Orange and banana had to be covered twice because the material was thin and you still could see some of the newspaper color coming through. I'm glad i got them all done!

I'm cutting it close to Thanksgiving! I hope to have it all done tonight (crossing my fingers). Tomorrow starts the cooking :)

Read more...

Thanksgiving Cornucopia #1

>> Monday, November 12, 2012

This is a very cheap craft project for Thanksgiving. I had everything i needed.

So far i have used:
  • Newspaper
  • Yarn
  • Scissors
  • Water
  • Aluminium Foil
  • A Store Plastic Bag
  • Tape
  • Flour


Wet newspaper and shape into desired shape. Tie on a piece of yarn.

Wrap yarn around and mold into desired shape. Leave to dry completely

These were my little helpers, with their goofy smiles :)

My helpers told me what shapes to make.
So far here we have an apple, orange, two strawberries, pear and banana.
These we will layer with mod podge and fabric to give it that rustic look.

Next we make the cornucopia. Mix flour and water together till your get a soupy texture. This is our homemade glue. Take aluminium foil and form into desired cornucopia shape. Then wrap the cornucopia shape with grocery store plastic bag. Tape bag snugly to shape. This will hopefully allow the newspaper not to stick and where you can pull out the aluminium foil once dry.

Cut newspaper into strips. Paint flour paste on one side of the strip of paper and wrap onto cornucopia shape. I used a basting brush.

Keep layering newspaper strips on, the more layers the stronger the cornucopia will be.
Once enough layers are applied you could either mod podge with fabric like the fruit/vegetables or you could paint.

Next steps soon to follow!

Read more...

Christmas Houses In Progress

>> Thursday, October 25, 2012


Inspiration:

I took this ladies idea and since i'm not a Halloween person, i decided to switch it to a Christmas house. I ordered most of my supplies from Hobby Lobby's online store on Monday and today I got my package. It was only like $3.95 shipping and i still got to use the 40% off coupon, so i think it was worth it if i calculated what i would have spent in gas!

Here is what i got:
The three houses came in a set, then i got two sizes of miniature Christmas trees, some miniature wreaths for over the doors, some miniature Christmas lights and then some glitter glue sticks :)

First step is to pain them a base color. The tutorial has you use spray paint and in black. I didn't want to spend more money on spray paint so i used a foam brush and my acrylic white paint.


So i have them all painted on the outside and i painted the inside of the big house, thinking about the light reflection of the candle inside... but i didn't on the other two.... i may go back and paint the inside of those to for safe measure.

See the popsicle sticks on my paper? I cut the bottoms to be flat and i'm thinking of painting them white and using them as a white picket fence for the big house. We will see how that works. The way i am thinking of doing it sounds like a big headache to me... we shall see!

Had to stop for now because it's dinner time. I'll do more later!

Read more...

Making Travel Activities For My Girl

>> Wednesday, July 11, 2012

So i woke up after a nap the other day with lots of different ideas. It was weird cause i wasn't even thinking about this before i went to sleep.
See my husband is a football coach and football season is just around the corner... that means me lugging my girls to as many games as i can. When you have a 2 and 3 year old girls it's kinda stressful to take them to games and not have them go crazy sitting for so long.
Last year i made two of these: 

Added the child straps to the travel seats. This helped a ton! But my next issue was entertaining them and also my diaper bag. See after shoving all the snacks and cups and toys to try and keep them occupied in my bag, it was crazy full and would get jumbled as soon as i would have to pull something out.

My goal is to try and keep things as simple as possible. See it's just me lugging a double stroller, three stadium seats a big stuffed diaper bag, and later in the season blankets. Yeah i look pretty pitiful and sad looking lol. I'm sure i cause some to laugh. This year i'm kinda dreading it cause i'm trying to potty train my oldest and i don't even want to think about lugging her, my youngest and my diaper bag into the bathroom. Haaaa.

Anyways here are some of my ideas i'm trying to make reality.
  • So this was my supplies:

And this is what i did with them. I used the marker lids and attached the elastic thread through the holes in the caps.


The caps will be krazy glued to the colored pencils (hope it holds up) Then i will wrap the elastic ends in fabric and sew the heck out of them to keep the elastic in place.


Then the other end of the elastic on the colored pencils will be attached to the clip.


This way the girls will be able to color and the colored pencils will not me able to drop (or be thrown like they like to do at the games) I'm hoping this works good and entertains them for at least a little while.


  • Then i looked on Amazon for an 'I Spy' book but was having a hard time. I could find lots of i spy games but i wasn't finding just the books which i found to be very odd. I adore I Spy books. Heck me and husband love to sit and try and figure them out together to this day!.
So instead i decided to make my own. I purchased these:


 (100G. Lot Assorted Resin Flatback Scrapbooking Buttons Cabochon Craft Supplies)
and...
(100g. Mix Assorted Food Cup Cake Fruit Candy Resin Flatback Scrapbooking Buttons)

That's about 150 little trinkets. I bought this little glittery photo book:


So i figured the one page can be the i spy page and the opposite page can be the page showing you which items you are looking for.


Also while looking for my daughters birthday gift i came across this and ordered it.


It was described as "Choose from among fourteen fun themes, slide a card into the gameboard and start looking for matches. This handy memory game includes one game board, seven double-sided game cards and a two-player scoreboard. There are no loose pieces and everything conveniently stores in the board."

Next will be figuring out a better travel bag/diaper bag and i think i already have the idea for it!

Read more...

Quiet Book

>> Friday, May 18, 2012

Instructions @ creatingbycami.blogspot.com

Read more...

Christmas Decorations Ideas

>> Wednesday, May 16, 2012


Read more...

Dying Buttons

>> Wednesday, May 09, 2012

Instructions @ www.ritdye.com

Read more...

My Day Dreaming List:

Followers

  © Blogger template Webnolia by Ourblogtemplates.com 2009

Back to TOP