Showing posts with label Tutorials. Show all posts

DIY Education Cube

>> Saturday, October 12, 2013

Success! 

So while searching the vast homeshool resources out there, i can across a cute little bird printable board game that i thought would be fun to play during our Nn-Nest unit week. Come to find out the board game was printable but it required an ‘Education Cube’. I went to the Education Cube website. You had to first buy an education cube (which was out of stock and didn’t list the price) and then pay a membership fee to gain access to the education cube printable database to print the pieces needed for the game. I liked the idea of the education cube, could be used for tons of things, but i didn't want to pay (even though it’s a one time fee) to be a member of the printable site…. later i might change my mind but for now i wanted to go all DIY on the place.

I thought ‘A cloth cube…. easy… adding clear pockets to the sides should be easy as well!’

I had already purchased and had on hand the clear plastic needed for the pockets (had it for some other projects… LUCKY!!!) So i found a cloth cube tutorial (HERE) because i had never made one before. The pattern happened to be for the perfect size cube. I wanted to make my pockets on the cube the same size as the store bought education cube that way in case my cube turned out great i could later become an education cube member, if i so chose, and their printables would fit my cube.

The fabric pieces are 5in X 5in
The clear pieces are 5in X 4.5in
And i used 3/8 seams

First Attempt:


Problems:
I don’t know if it was user error, meaning that the plastic slipped while i was sewing or that i’m using the poly fill to fill the cube which puffs out the sides but my pockets bulge out some. The cube still works, it rolls and does what it is suppose to do but i am a perfectionist and having the sides bulge out is driving me crazy. I plan on making another one and basting the plastic onto the cloth pieces before i sew the pieces together and also using some of my left over cushion padding for the filling which is stiffer and i can cut it into a square.
If the new one works better then i will post about it later. Until then, this one does the job fine and we have already used it!

BUT....

I attempted it again and did those things i mentioned i wanted to try and it worked!


So here i have pinned some bias tape to the top edge of the clear pockets

Here the bias tape is sewn on.

The i sewed the clear pockets to my jean squares only on the sides to hold it on when i go to sew the rest. This was a little tricky. It kept wanting to gather the jean material under the plastic so i had to hold tight while i sewed. 

This is the filling i used for the insides. I cut stripes of left over seat padding i had on hand until it made a square the right size.

These are my pieces sewn together in the first step to completing the cube.

This is it sewn and filled, leaving the one side for me to close up.

Here i’ve pinned the edges of the opening in preparation to close it up by sewing it by hand.

Now it’s all closed up!

And here is it with the cards in it. No bulging pockets like the last one.
I love it!
So happy i got it to work right! Woot woot!

Ok so the Flap Flap & Fly printable game board is (HERE)
Then instead of paying the membership to gain access to the education cube printables needed for the game i went ahead and made my own.
Click on the pictures to go to the full size image where you can download and print your own for your own game if you so wish.

Flap Flap & Fly Cube Play Pieces
These are our game pieces.
I changed the colors so each of my girls could have their favorite color.
Flap Flap & Fly Cube Pieces 1
 Flap Flap & Fly Cube Pieces 2
These are the six pieces you use in your education cube/dice to play the game

20131012_092056
(As you can see this was taken before i made the new dice)
I cut out the bird pieces and put them in some colorful binder clips i had picked up at the Dollar Store when they had their ‘back to the school’ items.

 20131012_092046
(As you can see this was taken before i made the new dice)
My crazy girls getting ready to play the game.

They loved it by the way!

And now that i have the cube (and the good one) the possibilities are endless :D

More games will definitely be in their future!

Read more...

Chore Chart (2)

>> Tuesday, June 18, 2013

Making of the ‘Month’ magnets for the charts.

Supplies:

  • Scissors
  • Mod Podge
  • Brush
  • Xacto Knife
  • Sand Paper
  • Lamination Paper
  • Wood Cut To Size
  • Months Printed on Paper

2013-06-15 17.21.53

2013-06-15 17.26.15

So i tried just mod podging the paper onto the wood but the ink on the paper started to smudge with the mod podge. So instead i laminated just the front on the paper and mod podged that onto the wood. I hope it holds up good. It looks nice laminated.

We still need to by super glue of some sort to glue the magnets on the back.

2013-06-15 17.28.56 

I think i have done 7 so far and there is a total of 36 of just the months. Not to mention 93 of the dates of the month and 21 of the days of the week…. and that is just the beginning. TONS of little pieces. It’s going to take forever LOL especially since i only get my hands free (with no house work) very often. It will be nice once it’s all done though!

Read more...

Thanksgiving Cornucopia #3

>> Tuesday, November 20, 2012

Finally all mod-podged! I love the way it turned out! I could call it finished now but i do agree with Hubs that the strawberries would look way better with some green leaves on top. If i figure out how to do it (and if i have the right material) then i will attempt it. If now... well i think it's good enough how it is!


Read more...

Thanksgiving Cornucopia #2

>> Monday, November 19, 2012

So once i took the aluminum foil and plastic out of the middle the edge of the cornucopia was very thin. I did want to put on layer after layer to make it thicker but i wanted it to look more basket or bread looking. I took more newspaper and rolled it into a thin roll, wet it and morphed it to the shape of the edge of the cornucopia. I then took strips of newspaper and used my flour paste and basically taped the rolled newspaper to the edge of the cornucopia. This is what it looked like when i was done. See that the edge look thicker now? The illusion that the whole thing is thicker. Just what i wanted!

Here is a picture of where i stopped at right now. The inside is covered but the edges and the outside is 1/2 finished. I'm letting it dry and giving myself a rest before i finish it.

There are the finished fruit. Although my artsy Hubby said i should somehow with fabric add tops to the strawberries. (we will see if i get to that!) The Orange and banana had to be covered twice because the material was thin and you still could see some of the newspaper color coming through. I'm glad i got them all done!

I'm cutting it close to Thanksgiving! I hope to have it all done tonight (crossing my fingers). Tomorrow starts the cooking :)

Read more...

Thanksgiving Cornucopia #1

>> Monday, November 12, 2012

This is a very cheap craft project for Thanksgiving. I had everything i needed.

So far i have used:
  • Newspaper
  • Yarn
  • Scissors
  • Water
  • Aluminium Foil
  • A Store Plastic Bag
  • Tape
  • Flour


Wet newspaper and shape into desired shape. Tie on a piece of yarn.

Wrap yarn around and mold into desired shape. Leave to dry completely

These were my little helpers, with their goofy smiles :)

My helpers told me what shapes to make.
So far here we have an apple, orange, two strawberries, pear and banana.
These we will layer with mod podge and fabric to give it that rustic look.

Next we make the cornucopia. Mix flour and water together till your get a soupy texture. This is our homemade glue. Take aluminium foil and form into desired cornucopia shape. Then wrap the cornucopia shape with grocery store plastic bag. Tape bag snugly to shape. This will hopefully allow the newspaper not to stick and where you can pull out the aluminium foil once dry.

Cut newspaper into strips. Paint flour paste on one side of the strip of paper and wrap onto cornucopia shape. I used a basting brush.

Keep layering newspaper strips on, the more layers the stronger the cornucopia will be.
Once enough layers are applied you could either mod podge with fabric like the fruit/vegetables or you could paint.

Next steps soon to follow!

Read more...

Christmas Houses In Progress

>> Thursday, October 25, 2012


Inspiration:

I took this ladies idea and since i'm not a Halloween person, i decided to switch it to a Christmas house. I ordered most of my supplies from Hobby Lobby's online store on Monday and today I got my package. It was only like $3.95 shipping and i still got to use the 40% off coupon, so i think it was worth it if i calculated what i would have spent in gas!

Here is what i got:
The three houses came in a set, then i got two sizes of miniature Christmas trees, some miniature wreaths for over the doors, some miniature Christmas lights and then some glitter glue sticks :)

First step is to pain them a base color. The tutorial has you use spray paint and in black. I didn't want to spend more money on spray paint so i used a foam brush and my acrylic white paint.


So i have them all painted on the outside and i painted the inside of the big house, thinking about the light reflection of the candle inside... but i didn't on the other two.... i may go back and paint the inside of those to for safe measure.

See the popsicle sticks on my paper? I cut the bottoms to be flat and i'm thinking of painting them white and using them as a white picket fence for the big house. We will see how that works. The way i am thinking of doing it sounds like a big headache to me... we shall see!

Had to stop for now because it's dinner time. I'll do more later!

Read more...

Name Blocks Tutorial

>> Saturday, October 09, 2010

Instructions @ www.laforcebewithyou.com

Read more...

The Circle Skirt

>> Thursday, October 07, 2010

Pattern @ www.dana-made-it.com

Read more...

Hankie Baby Bonnet

>> Saturday, April 24, 2010

Get this tutorial @ www.somewhatsimple.com

Read more...

Heirloom Bloomers

Make baby bloomers out of old hankies.


Tutorial & Downloaded Pattern at : UCreate.com

Read more...

Cloth Travel High Chair


This fabric "high chair" is perfect for away from home dining.
It's no 5-point harness, but it helps secure them in the chair.

This one was made from an old thrifted, quilted ottoman cover

Gather materials: Quilted fabric* for outer, cotton broadcloth or similar for lining, Velcro. *Batting combined with broadcloth can also be used


For this one, I used a thrifted bedspread and bedsheet

Step 1 -
Make pattern pieces

All measurements include 3/8" seam allowance

Step 2 - Add markings 2 1/4" apart at center of each piece as shown in picture.

These markings will help you place the connector piece.

Step 3 - Using a single layer of lining and a single layer of quilted fabric, cut each piece out together.
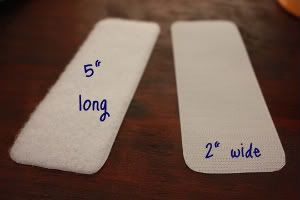

Curve the corners of velcro pieces so there are no sharp points

Step 4 - With right sides together, sew connector pieces together along long edges.
(3/8" seam allowance)


Step 5 - With right sides together, sew seat pieces together, starting at connector mark and ending at next mark, leaving open 2 1/4".


Step 6 - With right sides together, sew strap pieces together, starting at connector mark and ending at next mark, leaving open 2 1/4".


Step 7 -
Turn all pieces right side out and press.


Step 8 - Top stitch connector piece 1/4" from edge along sewn edges.


Step 9 - Insert connector piece into opening in seat and into opening in strap. Pin into place.


Step 10 - 1/4" Top stitch around entire edge of seat and strap, making sure to catch connector piece.


Step 11 - Hand stitch lip edge of strap and seat at connector for a more finished look.

or use 1/8" top stitch to secure lip.


Step 12 - Sew Velcro onto ends of waist strap, centering on strap & placing it 1 1/4" away from short edge.


Scratchy side goes on outside of strap


Soft side goes on inside of strap.
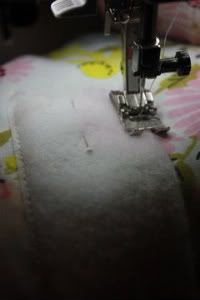


Sew all along the edge.


You're done!


Full article at: whrrl

Read more...

My Day Dreaming List:

Followers

  © Blogger template Webnolia by Ourblogtemplates.com 2009

Back to TOP