

 Instructions @
 Instructions @
 .JPG)


_edited-1.jpg) Instructions @
Instructions @  Instructions @
  Instructions @


 Instructions @
![jchairs[6]](https://blogger.googleusercontent.com/img/b/R29vZ2xl/AVvXsEhRk-4DezUJbcBZSThspEDfjiSuLN9LkFfALey9xzewjeLVJCujesw14vTkjvGaivELfPfYLXJQDp6vsGyn4p7cQ3kBgCuc5PGce_xyO2g6NN2L6KkwWInEIkk0xbWaxKZXJLLq/s1600-h/jchairs64.jpg "jchairs[6]")



1 month ago
Went Shopping
>> Monday, October 18, 2010
Went shopping in my yard. This is what i found:
I was surprised to find these pretty rocks in our yard. The previous owners were trying to built a pond in the backyard and i found these rocks close to the old pond.

Plans:
 |  |
 Some fall wall art. Good idea? No?
Read more...
Some fall wall art. Good idea? No?
Read more...
Crochet Baby Sock
>> Friday, October 15, 2010


This is my version of these socks. I'm terrible with reading patterns so i just winged it and this is how it came out. I was worried that one sock would not match the other one since i did not follow a pattern but they turned out great! Read more...
Recent Finds
>> Monday, October 11, 2010
Flea Market Finds:


Glass globe $3. We plan on making a light fixture out of this for the stairs.


End Table Lamp $3.99. Found this at the Goodwill. I plan on repainting it and designing my own shade for it.
Printing Images onto Fabric
>> Sunday, October 10, 2010

Instructions @ onecheapbitch.blogspot.com
I love this idea, it’s awesome! I can’t wait to try it!
Read more...China Cabinet – A Work In Progress
>> Thursday, September 23, 2010
Our inspiration:
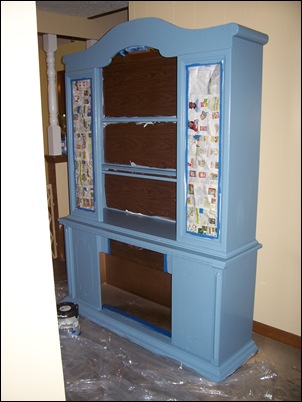
What we have to work with:
We hated the trim that was on it


But now I'm pooped and was feeling a little light headed by the killz primer i was using.
I’ll keep updating as i work on it.
9-23-2010
Last night i put the first coat of blue paint on it and today i put on the second. My husband has yet to put on the white bead board or the trim, so i will still have some painting to do but here is what it looks like at this point:
9-21-10
>> Tuesday, September 21, 2010
My mom came this weekend and helped me a lot with the new house. Some of the big things that managed to get done were:
- I got my sewing/craft room unpacked and put together. Now I’m planning on what color I want to paint the room and stuff like that.
- We got the mail box put up that Bob hand made (looks awesome)
- We took these ugly light fixtures, took them apart, spray painted them and got them hung. They look so much nicer then they did before we stripped them. Neither the living room or the dinning room have light fixtures so they had to be hung ‘swag’ like.
I should have taken ‘before’ pictures but I didn’t think about it till to late. This is the light fixture in our dinning room.
This one was the biggest transformation because in was incased with glass and looked horrid. Bob still has some more ideas for it but for now we hung in like this, in our living room.
Yesterday my mom went home but I still got a ton done. I painted the hallway pillars, and started stripping our bedroom of its nasty wallpaper. I’ve gotten almost all the paper off and plan on getting the little bit left, off today.
Almost ready to paint, YAY!
In the bathroom someone had painted the walls and used a trawl or something and made grooves into it. I guess it’s supposed to be designer but I think its UGLY. So we figured out to re-paint it we have to sand the walls until smooth. Well we tried doing it by hand and that was to hard so yesterday I went and bought an electric sander, it was cheaper them renting it for a day. It’s still very time consuming but I think to help it go faster I need coarser sand paper so I plan on buying some today.
I have no idea why they thought this was a good idea o.0
Then when Bob got home last night I mentioned that I couldn’t wait till our china cabinet was redone like we plan to. So he goes and starts tearing the nasty trim off it and going to work, which was great but now that is another big project for me to get done by this weekend, lol
I got the pillars painted, looks a lot better then they were.
I did manage to get a before picture of this, sort of… I mean the top trim is taken off in this picture but hopefully it gives you and idea of what it looked like, (that way I can post an ‘after’ picture)
Read more...
Subscribe to:
Posts (Atom)


