China Cabinet – A Work In Progress

>> Thursday, September 23, 2010

Our inspiration:

jchairs[6]

What we have to work with:

100_8631

We hated the trim that was on it

100_8632The trim piece on top and on these doors were actually plastic and fairly easy to take off.

100_8647

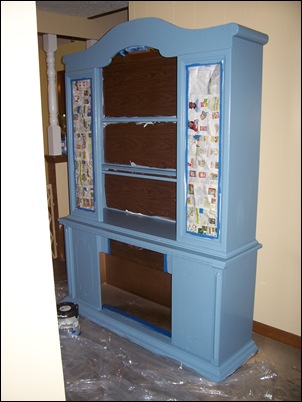
Here it is after i primed it. My husband rounded the top off, now it’s not as 70’s or whatever era (ugly is what it was). We are painting it a shade of blue but we will install bead board in the back of each shelf that will be painted white. I bought new silver handles and spray painted the hinges so they were no longer copper.

But now I'm pooped and was feeling a little light headed by the killz primer i was using.

I’ll keep updating as i work on it.

9-23-2010

Last night i put the first coat of blue paint on it and today i put on the second. My husband has yet to put on the white bead board or the trim, so i will still have some painting to do but here is what it looks like at this point:100_8670

We had thought the paint was going to be a tad bit darker then it turned out but i think it still looks nice, way better then it was in my opinion. We shall see how it looks against the green walls of my dinning room, that will be the real test.

Read more...

9-21-10

>> Tuesday, September 21, 2010

My mom came this weekend and helped me a lot with the new house. Some of the big things that managed to get done were:

  • I got my sewing/craft room unpacked and put together. Now I’m planning on what color I want to paint the room and stuff like that.
  • We got the mail box put up that Bob hand made (looks awesome)
  • We took these ugly light fixtures, took them apart, spray painted them and got them hung. They look so much nicer then they did before we stripped them. Neither the living room or the dinning room have light fixtures so they had to be hung ‘swag’ like.

clip_image002

I should have taken ‘before’ pictures but I didn’t think about it till to late. This is the light fixture in our dinning room.

clip_image004

This one was the biggest transformation because in was incased with glass and looked horrid. Bob still has some more ideas for it but for now we hung in like this, in our living room.

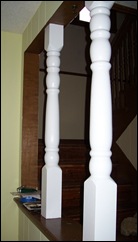
Yesterday my mom went home but I still got a ton done. I painted the hallway pillars, and started stripping our bedroom of its nasty wallpaper. I’ve gotten almost all the paper off and plan on getting the little bit left, off today.

clip_image006

Almost ready to paint, YAY!

In the bathroom someone had painted the walls and used a trawl or something and made grooves into it. I guess it’s supposed to be designer but I think its UGLY. So we figured out to re-paint it we have to sand the walls until smooth. Well we tried doing it by hand and that was to hard so yesterday I went and bought an electric sander, it was cheaper them renting it for a day. It’s still very time consuming but I think to help it go faster I need coarser sand paper so I plan on buying some today.

clip_image008

I have no idea why they thought this was a good idea o.0

Then when Bob got home last night I mentioned that I couldn’t wait till our china cabinet was redone like we plan to. So he goes and starts tearing the nasty trim off it and going to work, which was great but now that is another big project for me to get done by this weekend, lol
100_8636

I got the pillars painted, looks a lot better then they were. clip_image010

I did manage to get a before picture of this, sort of… I mean the top trim is taken off in this picture but hopefully it gives you and idea of what it looked like, (that way I can post an ‘after’ picture)

Read more...

Using egg carton for decor...

>> Wednesday, July 07, 2010

Instructions @ simpsonizedcraftsandthensome.blogspot.com

Read more...

Picture knob Plaques

Step by step instructions @ craftomaniac.blogspot.com

Read more...

Baby Food Jar Light Strand DIY

Step by step instructions @ apartmenthomesteader.blogspot.com

Read more...

Make Your Own Butcher Block

When i saw this episode i loved the ideas he had.

Check out the website: here

Read more...

Our first furniture redo

>> Sunday, July 04, 2010

Yesterday i noticed that by our dumpster area there was a mattress. I asked my husband if he would run over there and see if there was a bed frame to go with it. He found a twin sized bed frame, took it apart and brought it home.

100_8318

I thought of him cutting it down and making a toddler bed frame for our little girl who is going to need one soon, but instead he wanted to make a bench out of it, which of course is a lot more creative then my idea.

He got to working on it right away until he got rained out. Since this was our first redo we had a lot of altering from out original plan, and ended up with a lot more scrap wood then we might have if we knew exactly what we were going to do.

But i like what we ended up with. This is the bench before i painted it:

100_8319

100_8321

100_8320

What do you all think? I might end up making a padding for it, but then again i like the way it is as well.

Read more...

Diaper Pouch

>> Friday, May 28, 2010


Step by step instructions @ noodleheads.blogspot.com

Read more...

Ruffle Dress

>> Wednesday, May 26, 2010


Step by step instructions @ tearosehome.blogspot.com

Read more...

Stay-Put Kitchen Towels

>> Monday, May 24, 2010


Step by step instructions @ pin-sew-press.blogspot.com


I want to make some of these cause my daughter always pulls mine off and runs off, i have to look around the house to find them LOL These might be nice, but she would hate them ;)

Read more...

Dish Mats


Find out how to make these @ noodleheads.blogspot.com

Read more...

Mail Center

>> Thursday, May 20, 2010

4452020200_c1d1e2db13 Instructions @ www.brooklynlimestone.com

Read more...

3D Effect with Hot Glue

>> Wednesday, May 19, 2010

hot glue fleur de lis vase 017 Instructions @ makethebestofthings.blogspot.com

Read more...

Crackle Tutorial w/ Elmer's Glue


crackle tutorial 001 Step by step instructions @ makethebestofthings.blogspot.com

Read more...

Pillow Case Dress

IMG_2666 Step by step instructions @ www.prudentbaby.com

Read more...

Yo-yo’s

PICT0053Title Instructions @ tearosehome.blogspot.com

Read more...

Flower Tutorial

flower pin 013 Instructions @ www.madebylex.com/

Read more...

Pacifier Clip

clips1 Instructions @ www.rufflesandstuff.com

Read more...

Bunny Patterns

>> Monday, May 17, 2010

  1. Wabbit by Yoonie – Great twist on the more traditional rabbits you’d find in Easter hampers, I can really see this softie becoming my son’s favourite very quickly.
  2. Chibi Bunny by My Little Mochi – Awesome details with the embroidery, and I really like the touch of colour added with the printed cotton on the bottom, the pattern is also included for a kitten in a similar style.
  3. Recycled Bunny by Kayte – Big blanket stitch and the naive styling to this stuffed bunny give it lots of charm.
  4. Kwoozy Rabbit and Carrot by Kwoozy – Every rabbit needs a carrot, right? This pattern also features food for your bunny. Again I love the use of bright prints!
  5. Cashmere Bunny by Betz White – Made from recycled sweaters this is a great way to use up those thrifted jumpers you’ve been saving, I also love the needle felted heart on the bum.
  6. Tippy The Snow Bunny by Q. D. Patooties – With autumn now officially on its way in Australia, you can welcome in the cooler weather with this winter themed bun.
  7. Revoluzzzionary Easter Bunny by Suse – Two options with the pattern, one simple bunny and one a little bit more advanced with the addition of limbs.
  8. Hazelnut Felt Bunny by Jacqui – Very reminiscent of Beatrix Potter and more traditional bunny softies, if you’re looking for a more vintage bunny in your basket, this may be more your style.

Read more...

Bouquet T-Shirt

boquet3 Instructions @ www.rufflesandstuff.com

Read more...

My Day Dreaming List:

Followers

  © Blogger template Webnolia by Ourblogtemplates.com 2009

Back to TOP